This week one of my neighbors left his unwanted Ikea bed frame in the alley. Among the parts of the bed was a set of SULTAN LADE slatted base. In other words: 20 3/4″ pine boards for free. Keep an eye out for these because they can be used for a ton of simple DIY projects.
 With these, I decided to make some super simple diffusors to cover up the bare wall around the closet at the back of my studio. The goal was to use the least amount of materials, hardware and effort. This design accomplished that and I didn’t even need to use a saw.
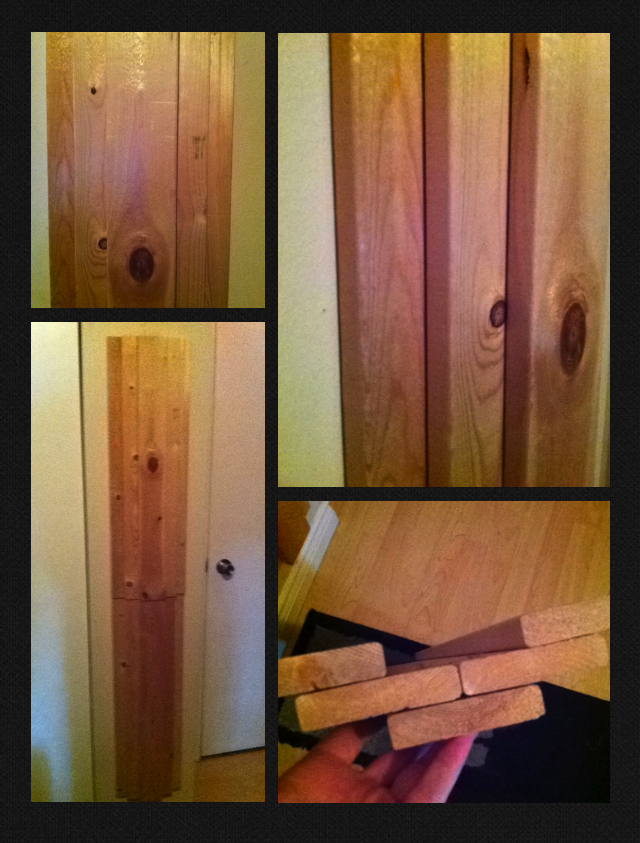
Each diffusor is made of 5 boards in a wide V shape. I used extra boards to get the spacing right, then held it firm with a pair of C-Clamps while hammering. The clamps were a huge help to prevent the boards from shifting around. I had just enough nails of the right length to build two diffusors, I would have built 4 if I had more nails. These aren’t very heavy so for now I have them mounted with a single drywall screw and picture hanger.
I’m sure an expert will disagree with the design as an effective diffusor. QRDs these are not. However, just holding it to the wall I could hear it was doing something far better than a bare wall. Unpainted soft wood like pine is porous and I could hear it softening the highs a little. Not sure if it scatters the sound at all but surely it is doing something more than the drywall was. QRDs are complicated, heavy and extremely labor intensive to DIY.
There are two downsides to building with free/salvaged wood like this.
1 – needing to remove staples, screws or nails before you can build.
2 – Sometimes the wood is warped which is hard to fix.
These don’t sit as flush on the wall as I’d like because of some warping.
I’m undecided whether I will leave these natural or stain them. If you’re looking for a simple wood stain, vinegar and steel wool left in a jar for a few days will give you a nice grey aged fence/barn wood look. Toss coffee grinds in the jar too and you can get a pretty dark almost chocolate brown stain. Teas, cocoa or spices can give you different colors. Steep longer and apply repeatedly for darker color. Again, super simple and practically free, but also it doesn’t stink up your house for days with toxic fumes.
I have some more ideas for diffusors which I will explore at a later date. One idea is to use the curved SULTAN LUROY bed slats and symmetrically staggering them at a few different heights and depths. Would probably look really nice and modern in a live room especially behind a drum kit.
Have you made a DIY diffusor? I’d love to see it, leave a comment and link below.
“I’m sure an expert will disagree with the design as an effective diffusor. QRDs these are not. However, just holding it to the wall I could hear it was doing something far better than a bare wall.”
Exactly right on all counts. This is *not* a diffusor, which will scatter sound equally in all directions. A true diffusor is very complex to build, and needs a mathematical sequence of wells at precise depths. That said, what you have built is better than a bare, flat, reflective wall in the sense that it will break up sound waves to a degree.
I’m sure it’s an improvement! Nicely done on using found materials to improve your sound. But in the name of technical accuracy, I wouldn’t call this a diffusor.
Hey Jon,
This is great…I just got the power turned on in my new basement studio I have been building, and I am about to embark on some DIY panels for some treatment! This looks like a great idea for low budget, quick finish building… Joe Marsh
Thanks Joe. Let me know how it turns out or what you come up with instead.
I just built some 20 space DIY racks for all my rack mount gear today…They look great!
I’d like to see that
I took a HUGE amount of time to build QRD diffusors (both 1D and 2D). I liked the results, but then when I took them out for an experiment and tossed up Roxul, I didn’t feel all that different with the results. Life was about the same.
Based on my home made experiences, I think the formal QRD thing is overkill in most situations most of the time. Perfect scattering of all frequencies feels like a good idea in principal, but the odds of it making your day or your recording are probably quite slim. If you do somehow have a reflection with excessive lobing, toss your Ninja Turtle blanket on a mic stand. Solved.
Absolutely, Genius!!